Programming the R75 Pro using VIA
Remapping on the R75 could be a little confusing, but it's quite powerful.

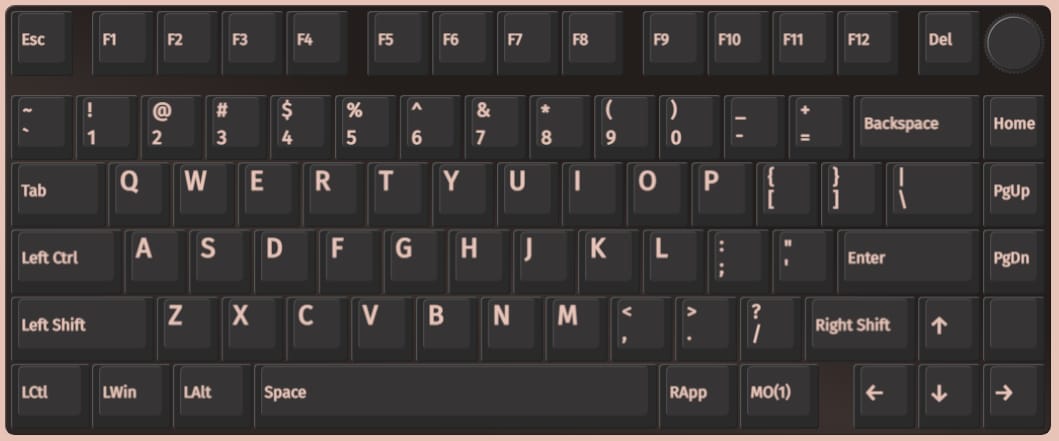
VIA Introduction
Let's start with QMK. QMK is the low level firmware that runs the keyboard. It defines the physical layout, defaults keys, color patterns, special functions, Bluetooth/Dongle functionality, etc. Everything the keyboard does, is because of QMK.
VIA is a programming mechanism that is implemented inside QMK. It allows programming the keyboard using a web interface that's common to any keyboard that supports VIA without using one-off OS-specific software. If you have multiple keyboards that support VIA, you can configure them all the same way using the VIA app.
However, let's briefly circle back to QMK. Even though the R75 is running a customized QMK firmware, as far as I am aware the source code of that QMK firmware is not available. There are a few source repositories of similar QMK firmware, but I am not sure that any of them would work on this specific keyboard, and I'm quite sure that using any of them you would lose all of the wireless capabilities of the R75 Pro Tri-Mode. And if you flashed them, and wanted to revert to the QMK firmware that shipped on the keyboard I offhand do not know where you would get that firmware file from, as I have not seen it provided by Royal Kludge. I suspect their Support staff could provide it, however. So, can you go full custom firmware on this keyboard? Very likely, but you'll lose all wireless capabilities. Do most users need to? Probably not.
Using VIA for the R75
The R75 manuals explain briefly how to use VIA, but they both give a URL which is no longer valid as far as I can tell. The product page on the Royal Kludge site does have a link to Software ⇾ VIA drivers, which is where I suggest you get the JSON file if you want to use VIA. To make sure this does not go away in the future, I've also saved it into a Google drive.
But as the docs say, go to https://usevia.app, then under the Settings tab enable Show Design tab, then in the new Design tab, load the JSON file. You'll see the layout change to that of the R75. At this point plug the keyboard in (possibly re-plug it on USB if already connected) and then click Authorize Keyboard. It should pop up a dialog listing the R75Pro and when you confirm, you should see the keyboard and all of its layouts and options under the Configure tab.
Before you get too deep into VIA, it might be a good idea to read https://docs.keeb.io/via and just look around in the VIA interface before making any changes. Within VIA itself, most functions, both assigned on the keyboard and things you can assign to keys below, have some sort of hover text associated with them. This hover text will not necessarily explain the function, but in most cases if the function text is truncated and you can't read it, the hover text will show the full function name.
As I know, no matter what you do inside VIA you can always do a reset on the keyboard itself. However, you can also Save and Load layouts (bottom-left corner) so I would suggest doing that frequently while making changes. Changes in VIA reflect immediately on the keyboard, so if you make a mistake you're not sure how to undo, loading a previously good profile will revert the changes.
Using VIA and Layers
Once you get an idea of how VIA is laid out, go back to the Configure tab and look at the top left. You'll see LAYER 0 1 2 3 4. These let you pick the layer you are modifying, IE: defining what happens when you hit a key at each layer. For example, Layer 0 is the keyboard without hitting any modifier keys, FN key, etc. Layer 1 is when you hold the FN key.
But there are five layers, and below are layers 0-3 with a brief description and screenshot. Layer 4 is further down in the article, as it's (by default) a little special.
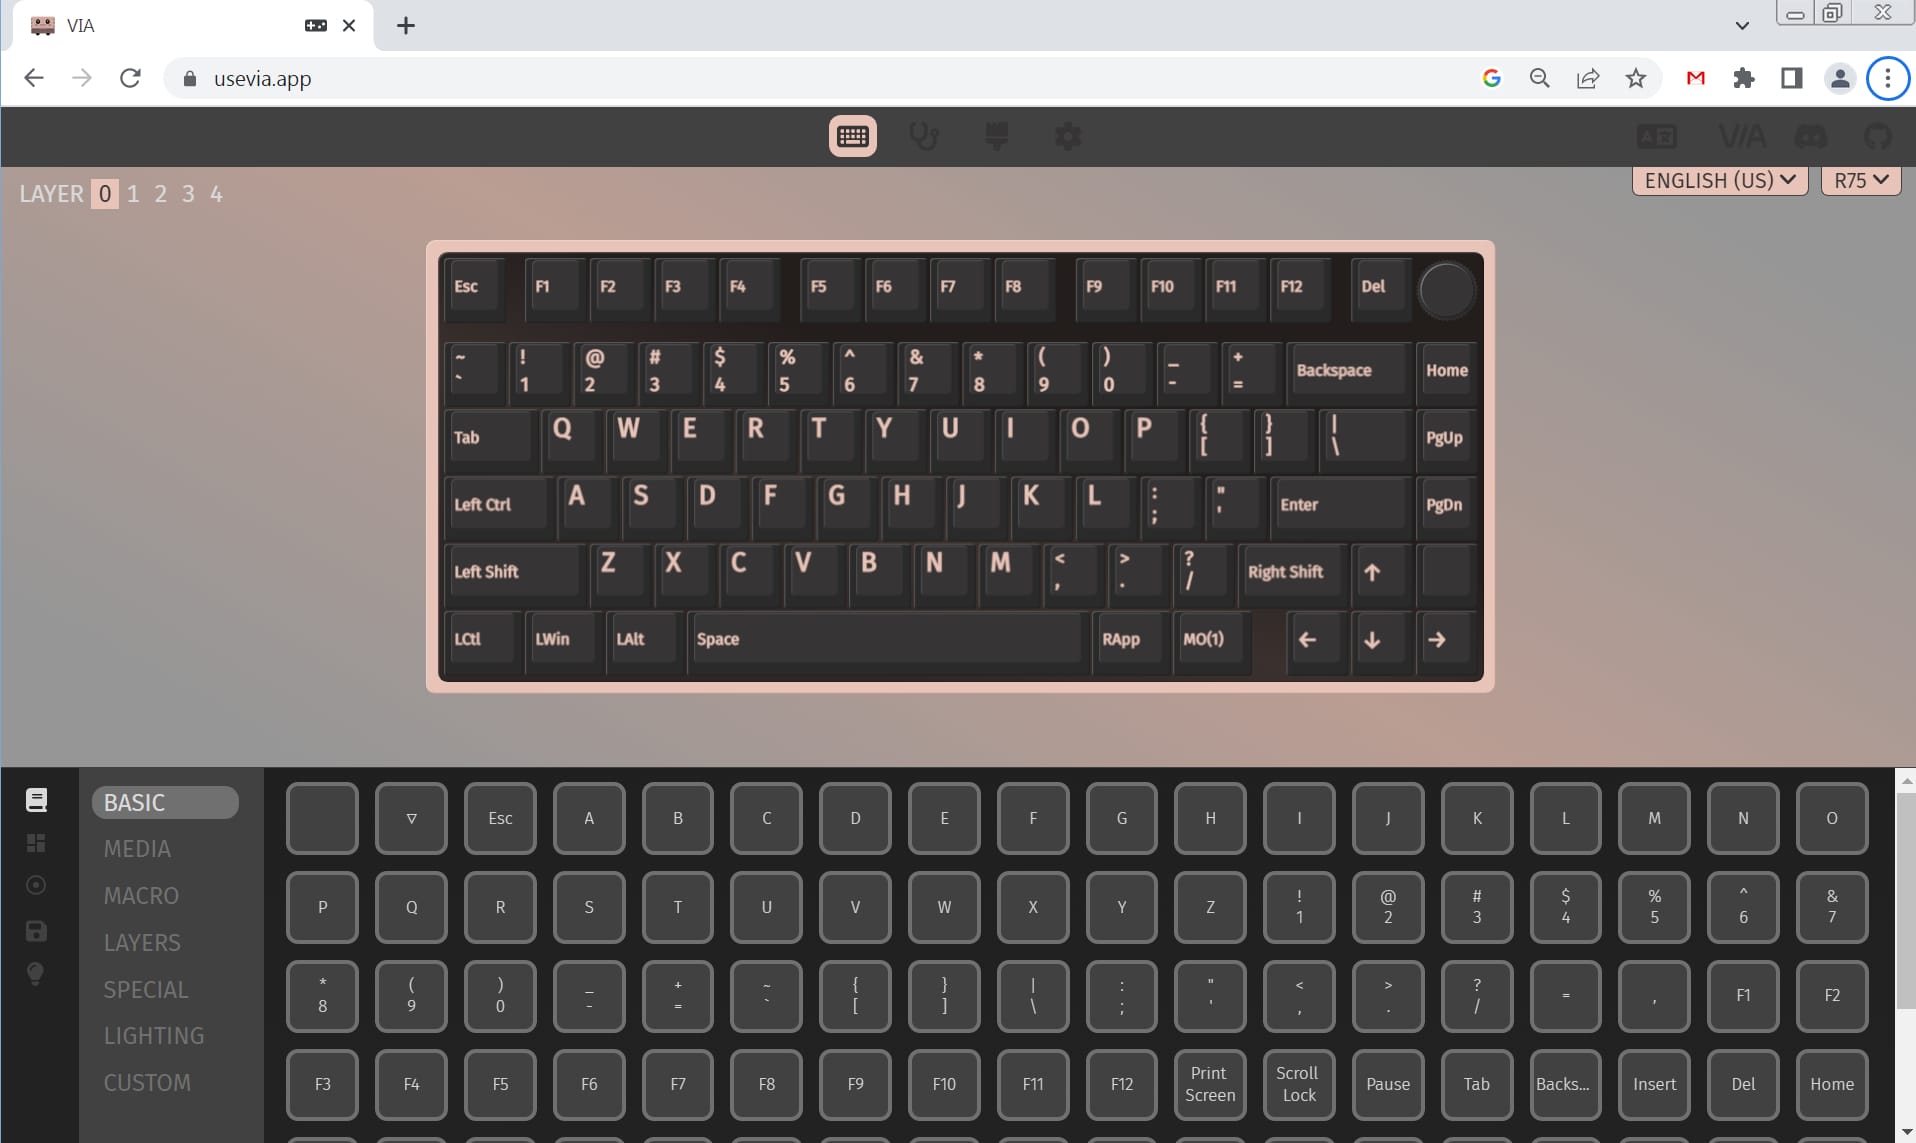
Layer 0
This is the standard layout without hitting FN, etc., just typing on the keyboard. I have slightly tweaked this, but this is generally what you'll see on Layer 0. This is the "Windows" layer, which is default, or if you've switched it to Mac in the past, FN-A switches back to this.
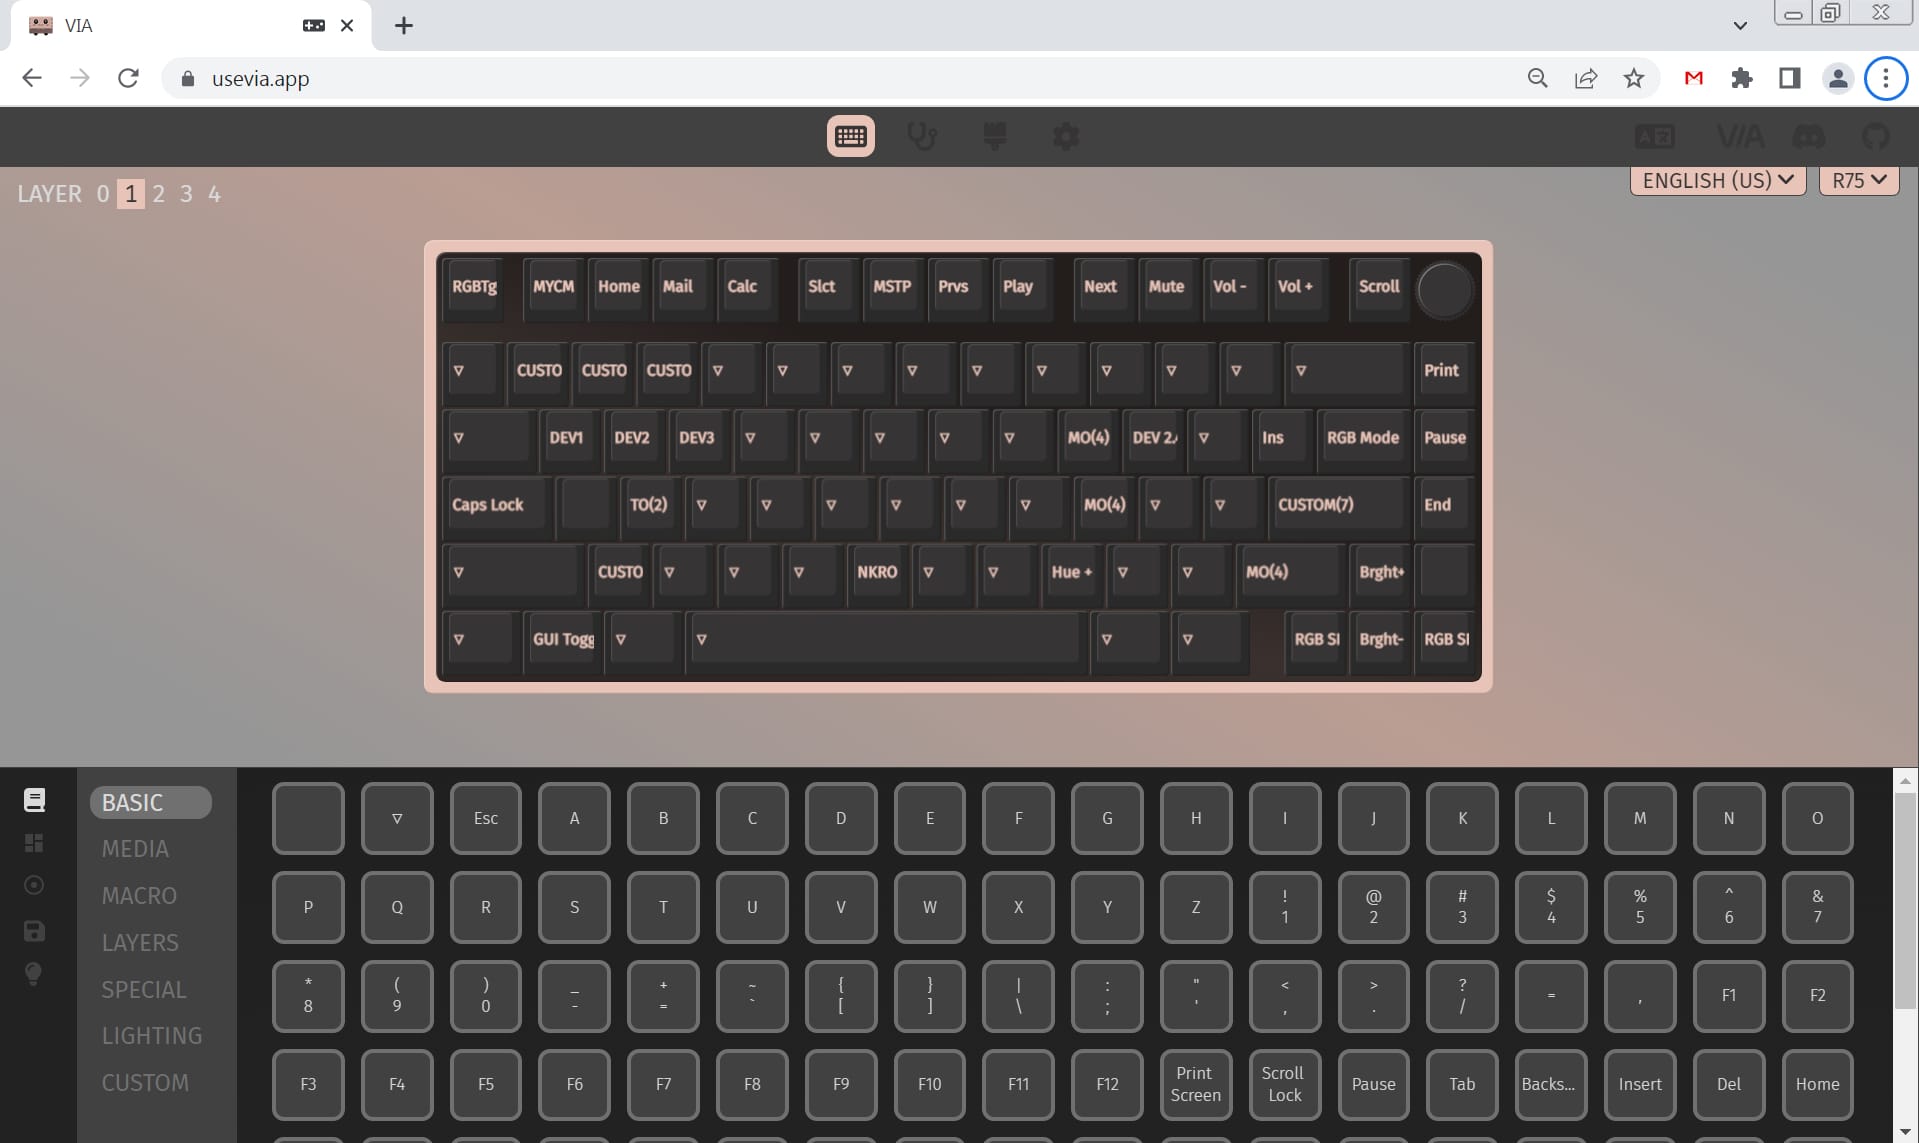
Layer 1
This is the "Windows" layer, but when holding the FN key. Again, this is slightly tweaked for me.
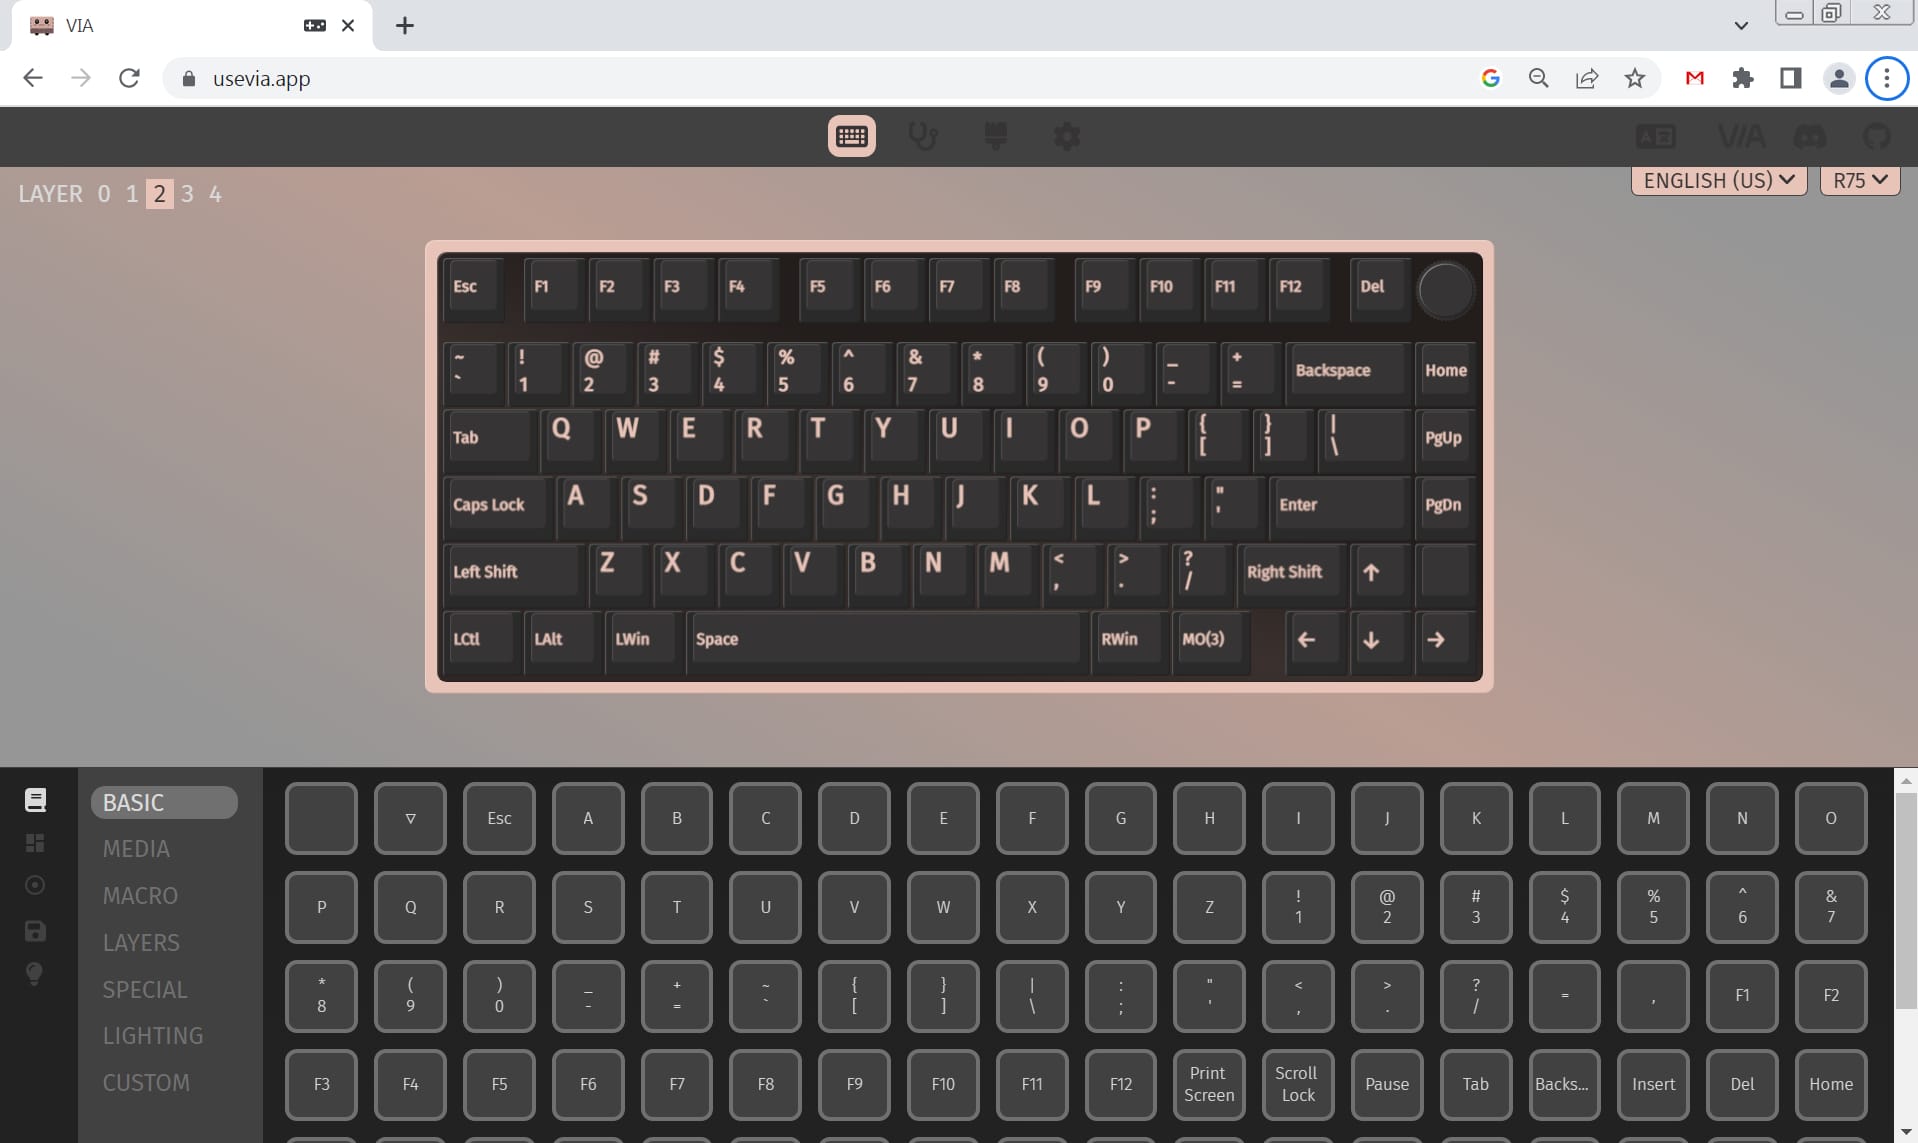
Layer 2
This is the "Mac" layer, ie: if you hit FN-S. Interestingly I just noticed that the R75's default settings on the Mac layer the F keys send F keys. Most keyboards when switching to "Mac" mode, the F keys by default send media keys. You can, of course, modify this if you so choose.
Layer 3
This is the "Mac" mode, but when holding FN.
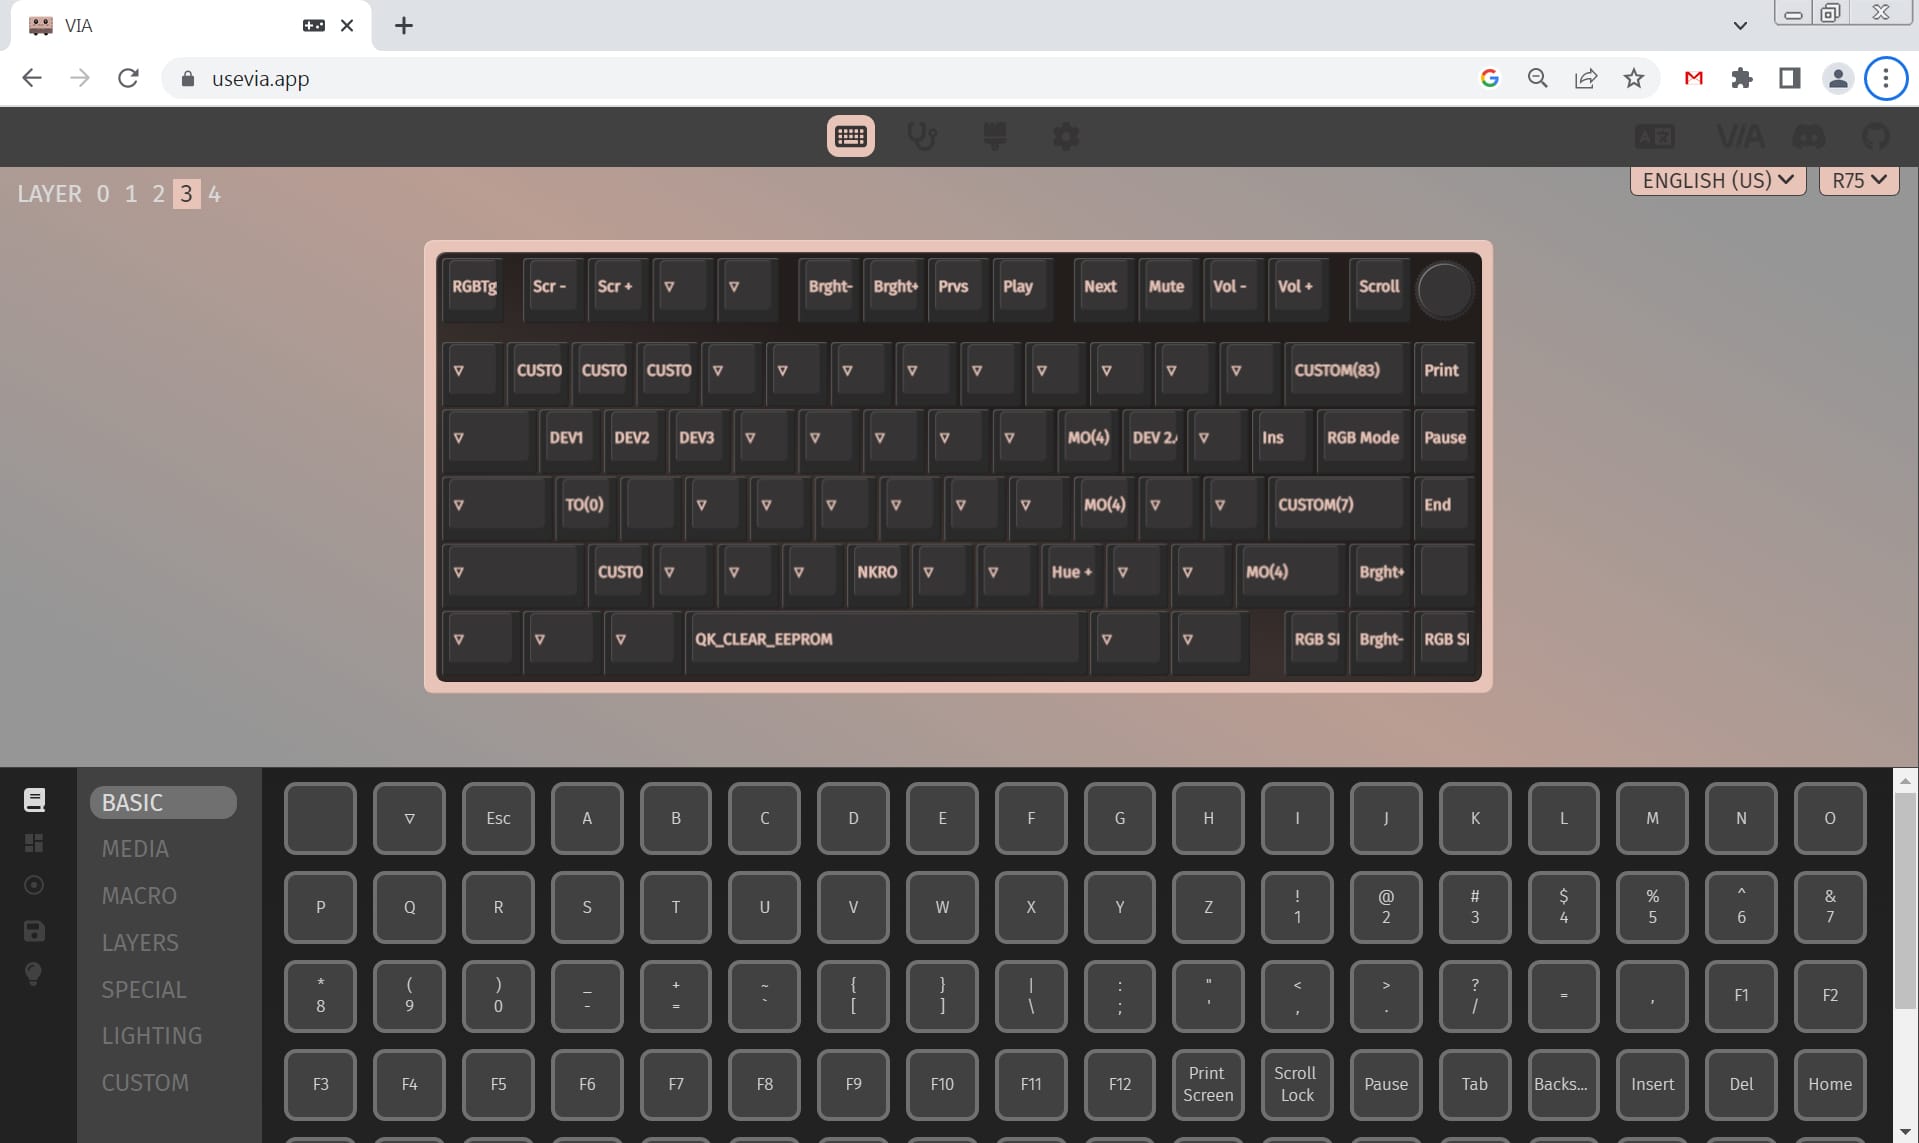
Basic Remapping
Let's say you just want to remap Caps Lock to a Control key, the following is how you would do that.
- Make sure you're using Layer 0 by clicking 0 beside LAYER at the top left of the screen
- Click the Caps Lock in the representation of the keyboard in the middle of the screen
- At the bottom of the left side of the screen screen, make sure you're in the KEYMAP section and BASIC category (see screenshot above)
- Scroll down in the list of keys to find Left Control and click it
- The representation of the keyboard immediately updates to show Left Control, as does the keyboard itself
Using Macros
Basic text macros are pretty easy, just go to the Macros section in the bottom-left side of VIA, pick the macro you want to edit (such as M0). You can either have it record the macro, or you can click the button that looks like </> and type in a macro. Macros can be simple text, or be QMK control codes. I suggest you read more in the VIA manual if you want to get fancy, as I am not going to attempt to explain how to do that here.
Once you have your macro defined, you simply assign it to a key in a layer like you would any other key. For example, if you want FN-Z to send M0, go to the Configure tab, click Layer 1, click where the Z key is, click MACRO in the KEYMAP options at the bottom of the screen, then click M0. Now FN-Z sends your macro.
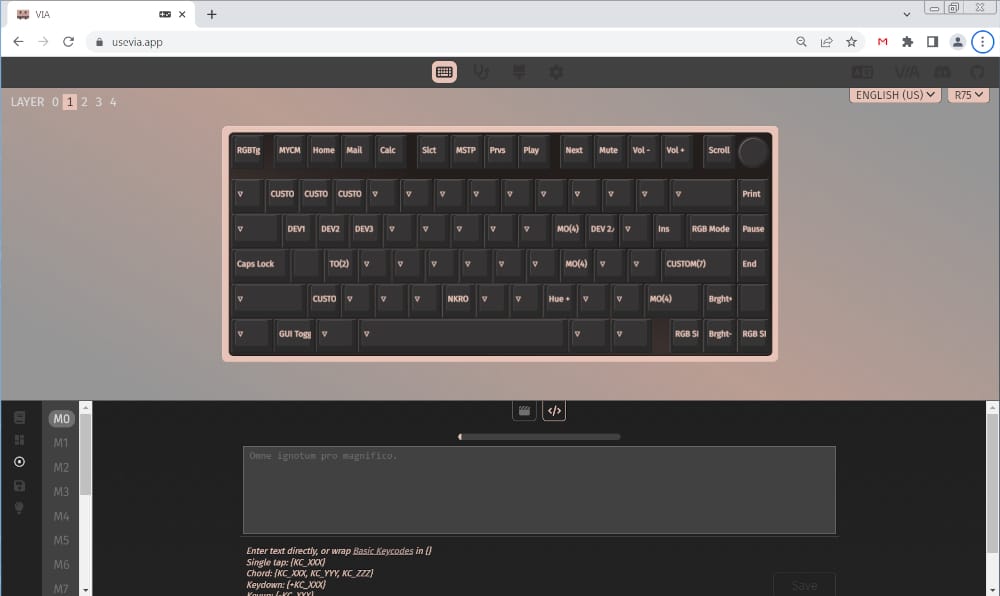
RGB Lighting
The JSON file that VIA needs defines a bunch of lighting modes available in the Lighting section, however, most of them seem to overlap with those available directly on the keyboard. Also, there does not seem to be a way to do per-key RGB within VIA, so you'll have to do that directly on the keyboard itself. I am somewhat disappointed in the Lighting functionality in VIA, but after talking to the VIA developers and users more, VIA simply exposes what has been programmed in QMK and this makes it difficult or impossible to implement per-key RGB in VIA.
More Advanced Remapping ideas
So if you want to add a custom layer, perhaps one with a numpad, or one that caters to a specific game, etc., you could potentially put that on Layer 2, which is technically the "Mac" mode. To switch to it, you would just press FN-S, and to switch back, FN-A. Just make sure to leave the assignment for the "A" key in Layer 3, so you can switch back.
You can also put keys/functions in Layer 4 and access them somewhat indirectly. I talk more about this below, but hitting FN-O, L, or Right Shift execute the MO(4) command which means to momentarily activate layer 4. So you can make assignments in Layer 4 then hit FN-RightShift-key to use it. You could always change the L and O, or Right shift assignments on Layer 1 to something different if you prefer to activate Layer 4 a different way. It's actually not too complicated if you don't overthink what each layer does and how they're used. In reality, most users will likely never directly use Layer 4; but it's there to use!
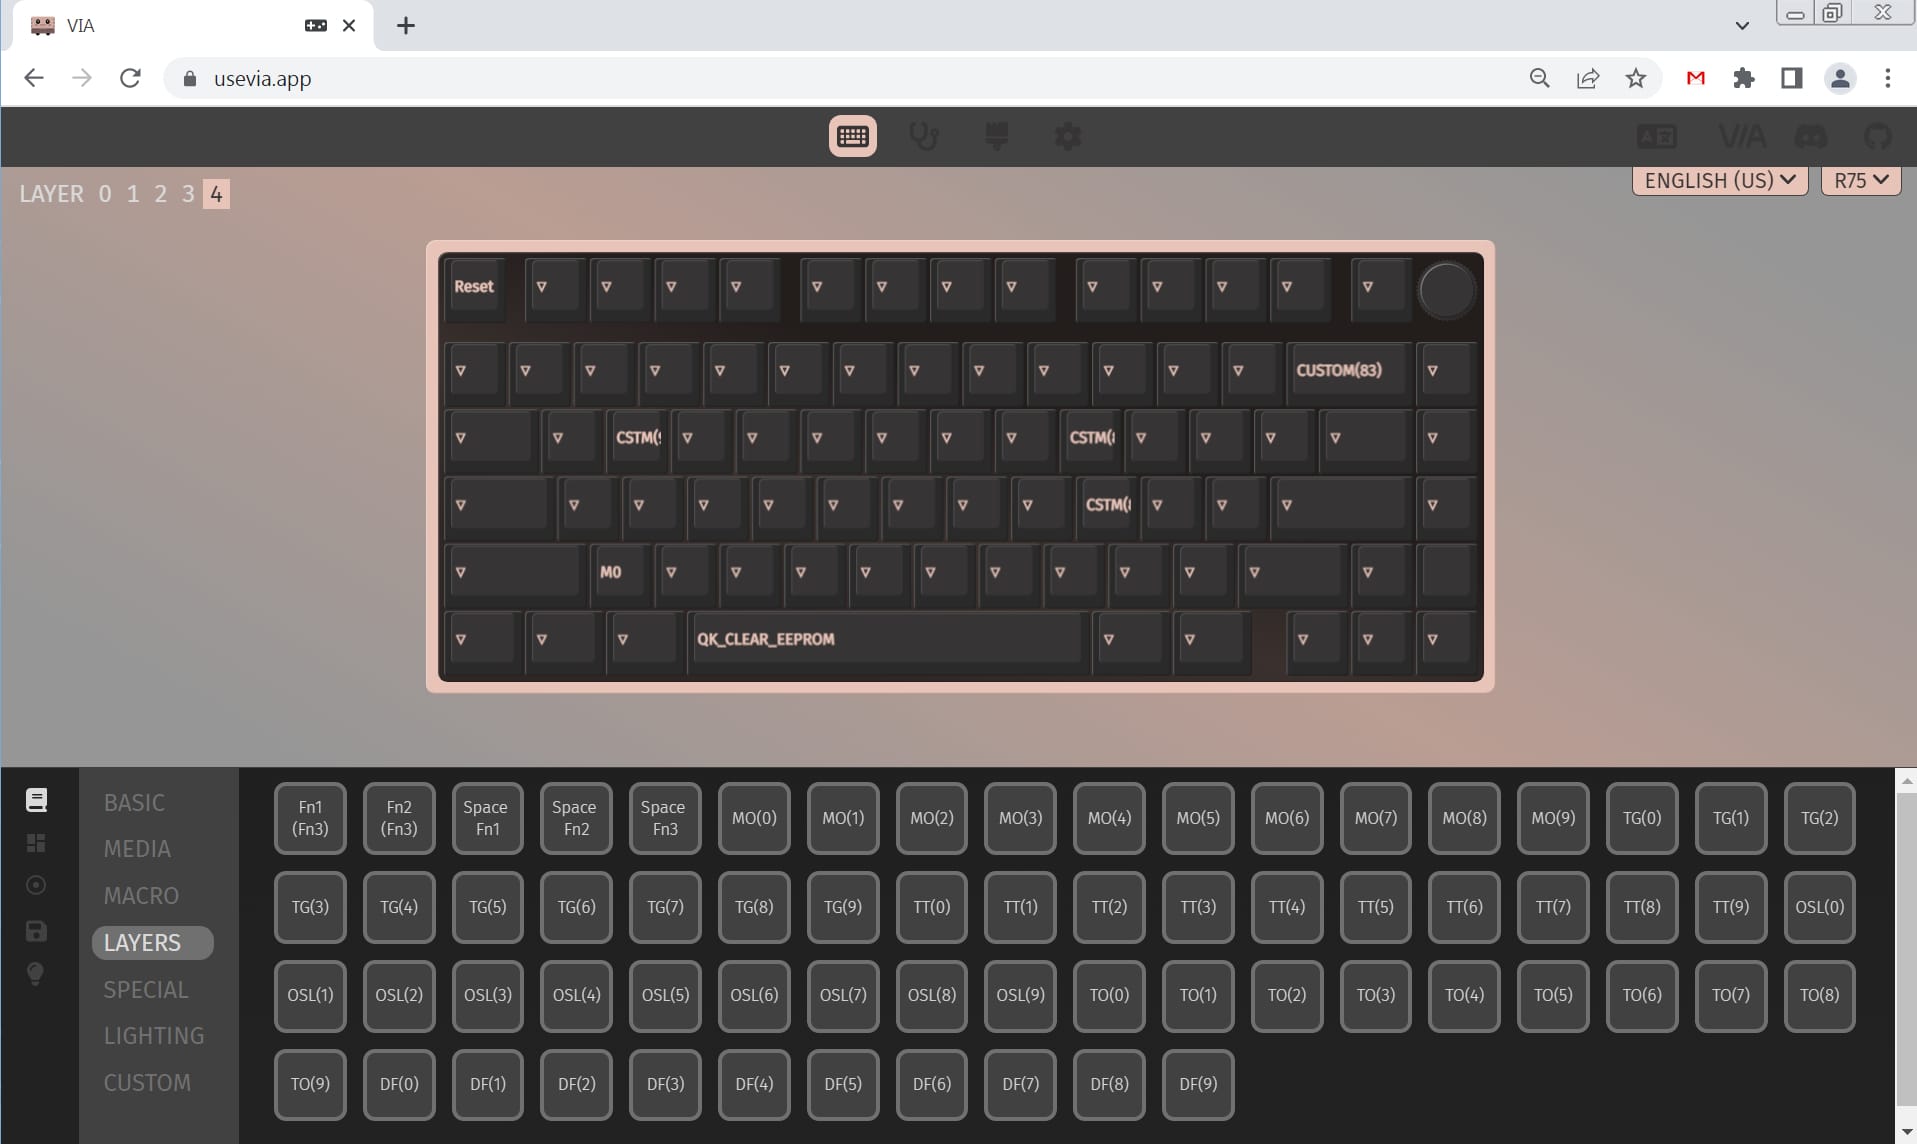
Advanced stuff you could do
You could, if you had a need to, do things like treat layer 2, 3, and 4 as directly accessible layers, like assigning FN-A to TO(1), FN-S to TO(2), FN-D to TO(3), FN-F to TO(4) in basically each layer so you can go between them directly. You'd just have to make sure that each layer has the ability to return to a previous layer. Keep in mind there's no layer 5, so FN on layer 4 could be set to anything, but on Layer 4, FN-Key would do nothing. FN is really just MO(1) on Layer 0; IE: momentarily activate layer 1. So on Layer 4, you'd need to have some direct key go back to the other layers, like maybe just A = TO(1) which would switch back to layer 1. Needless to say, you could potentially have the keyboard work "as intended" on Layers 0 and 1, then use 2, 3, and 4 to create entirely custom layouts. Want to learn an alternative keyboard layout like Colemak? Put it on Layer 2, and perhaps "fix" Layer 3 to match Layer 1 or whatever makes sense for you.
Some R75 layout quirks
There are a few things I do not understand a few things about the default R75 config. On layer 1, O, L, and Right Shift all do MO(4) which momentarily switches to layer 4. On Layer 4, Right Shift is unset which seems expected (not set means it will use the function for that key set in the previous layer(s)), but L and O are both set to a CUSTOM(8) which I have no idea what that means or does, and W is set to CUSTOM(9) which I also have no idea about. And on Layer 1, Z does CUSTOM(34) which, again, I have no idea what this does. I suspect these might be related to manufacturing, QA, perhaps debugging, not sure.
One key that is documented in the manual but may not otherwise be obvious what it does is FN-Right Shift-ESC. As mentioned above, this enters DFU mode, which is labeled Reset in VIA on Layer 4 on the ESC key. DFU mode is how you would reflash the QMK firmware on the keyboard and unlikely most users will ever need to do this.
Misc thoughts about VIA
I was initially concerned that the different modes (Bluetooth, USB, Dongle) might have separate key mapping, but that does not seem to be the case. I have seen some keyboards in the past which this was true, but they also were being set up directly on the keyboard, so perhaps each mode was a completely isolated profile on those keyboards.
Small warning about VIA; if you click a key and set it, VIA automatically moves to the next key in the matrix. I've accidentally set a few keys to things poking around in the UI. I would suggest after you've set the keyboard up a bit, make sure to save the layout (the Save+Load section on the bottom left) so if you make a mistake you can revert your changes.
You'll find a lot of functions in the Keymap area that may or may not work. All the normal keyboard keys/functions will, however there are things like in the Lighting section there are functions like "RGB Mode X" that do nothing. I'm not sure if these are just generic functions that VIA/QMK could potentially handle and the R75 does not or what. It's not an issue; just don't expect random stuff to always do something.
What I have remapped
I've tweaked a few things on my keyboard, and as I use it more I will continue to tweak it. None of these changes may be useful to other people, so this is not some guide of "things to do".
- Caps Lock is now Left Control
- And since Android sometimes gets Caps Lock stuck on for no reason, I have FN-Caps Lock set to do Caps Lock so I can toggle it back off if it gets turned on by accident
- Clicking the Volume knob is now set to Play/Pause and I set Layer 1's knob click to be Mute instead (ie: FN-Knob press is Mute now)
- I have put CUSTOM(83) on the Layer 4 Backspace and removed it from Layer 1.
- This is to mitigate what I feel is a bug about setting per-key RGB mentioned in the main R75 article.
- CUSTOM(83) is what is normally done with FN-Backspace, but I wanted to move it so it's impossible to accidentally hit. So per the FN-L/O/RightShift mention above, effectively I hit FN-RightShift-Backspace to enter per-key RGB mode now instead of FN-Backspace.
- And I have unset FN-Space as Reset (IE: Removed it from Layer 1), and put it on Layer 4 so I have to hit FN-RightShift-Space now to reset. This might make it easier to not accidentally reset the keyboard if I forget to turn it off and carry it around.
VIA on Linux so far does not work for me
I don't think this has anything to do with the R75, but I can't seem to use VIA on Linux in Chrome. I've set up the udev rules, the hid devices are read/write for my user, I've tried on a few distributions I have around, etc. I am just having no luck at all when connecting the keyboard to the VIA web app. I do have a Windows VM, and it works fine in that as well as an old Windows laptop, so it's not too big a deal. I have even asked the VIA folks on their Discord and after verifying I have set up the udev rules correctly they were also stumped as to why it is not working. I'll keep trying and if I figure out how to make it work, I will update this post.
Summary
I love VIA; I have always hated proprietary keyboard apps that are super confusing to use, sometimes not translated to English or translated in strange ways. Often the program is saved on an unknown cloud storage system, etc. VIA can be a little confusing to use at first, but it's consistent, and if you use multiple keyboards they all are programmed the same way. I wish the full QMK source was available, as keyboard enthusiasts have done some super cool stuff with QMK; but to use any of the available QMK code/forks out there, as far as I know, would give up wireless capabilities. I'm glad Royal Kludge is using VIA for programming some of their recent keyboards, and I hope they continue to do so. I also hope they consider trying to make the QMK source code available in the future.
Royal Kludge did not ask that I write a post about VIA when sending me the R75 at no cost, but since it is so closely associated, I have also tagged this post as a Sponsored Review.